Skip to content

Welcome to Planet KDE

This is a feed aggregator that collects what the contributors to the KDE community are writing on their respective blogs, in different languages

Thursday, 3 April 2025

Model/View Drag and Drop in Qt - Part 3

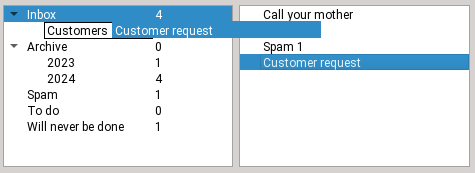
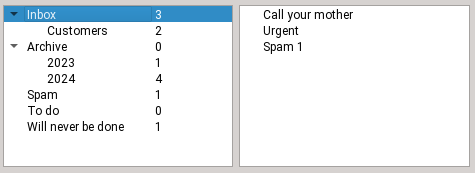
In this third blog post of the Model/View Drag and Drop series (part 1 and part 2), the idea is to implement dropping onto items, rather than in between items. QListWidget and QTableWidget have out of the box support for replacing the value of existing items when doing that, but there aren't many use cases for that. What is much more common is to associate a custom semantic to such a drop. For instance, the examples detailed below show email folders and their contents, and dropping an email onto another folder will move (or copy) the email into that folder.
Blog_Drag&Drop_Qt_part3-treeview-step1

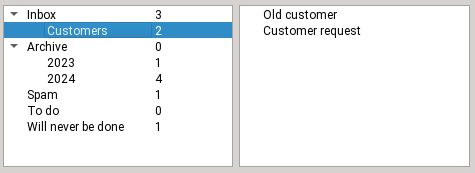
Step 1

Initial state, the email is in the inbox
Blog_Drag&Drop_Qt_part3-treeview-step2

Step 2

Dragging the email onto the Customers folder
Blog_Drag&Drop_Qt_part3-treeview-step3

Step 3

Dropping the email

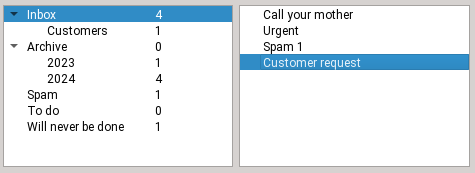
Blog_Drag&Drop_Qt_part3-treeview-step4

Step 4

The email is now in the customers folder

With Model/View separation

Example code can be found here for flat models and here for tree models.

Setting up the view on the drag side

☑ Call view->setDragDropMode(QAbstractItemView::DragOnly)
unless of course the same view should also support drops. In our example, only emails can be dragged, and only folders allow drops, so the drag and drop sides are distinct.

☑ Call view->setDragDropOverwriteMode(...)
true if moving should clear cells, false if moving should remove rows.
Note that the default is true for QTableView and false for QListView and QTreeView. In our example, we want to remove emails that have been moved elsewhere, so false is correct.

☑ Call view->setDefaultDropAction(Qt::MoveAction) so that the drag defaults to a move and not a copy, adjust as needed

Setting up the model on the drag side

To implement dragging items out of a model, you need to implement the following -- this is very similar to the section of the same name in the previous blog post, obviously:

class EmailsModel : public QAbstractTableModel
{
    ~~~
    Qt::ItemFlags flags(const QModelIndex &index) const override
    {
        if (!index.isValid())
            return {};
        return Qt::ItemIsEnabled | Qt::ItemIsSelectable | Qt::ItemIsDragEnabled;
    }

    // the default is "copy only", change it
    Qt::DropActions supportedDragActions() const override { return Qt::MoveAction | Qt::CopyAction; }

    QMimeData *mimeData(const QModelIndexList &indexes) const override;

    bool removeRows(int position, int rows, const QModelIndex &parent) override;

☑ Reimplement flags() to add Qt::ItemIsDragEnabled in the case of a valid index

☑ Reimplement supportedDragActions() to return Qt::MoveAction | Qt::CopyAction or whichever you want to support (the default is CopyAction only).

☑ Reimplement mimeData() to serialize the complete data for the dragged items. If the views are always in the same process, you can get away with serializing only node pointers (if you have that) and application PID (to refuse dropping onto another process). See the previous part of this blog series for more details.

☑ Reimplement removeRows(), it will be called after a successful drop with MoveAction. An example implementation looks like this:

bool EmailsModel::removeRows(int position, int rows, const QModelIndex &parent)
{
    beginRemoveRows(parent, position, position + rows - 1);
    for (int row = 0; row < rows; ++row) {
        m_emailFolder->emails.removeAt(position);
    }
    endRemoveRows();
    return true;
}

Setting up the view on the drop side

☑ Call view->setDragDropMode(QAbstractItemView::DropOnly) unless of course it supports dragging too. In our example, we can drop onto email folders but we cannot reorganize the folders, so DropOnly is correct.

Setting up the model on the drop side

To implement dropping items into a model's existing items, you need to do the following:

class FoldersModel : public QAbstractTableModel
{
    ~~~    
    Qt::ItemFlags flags(const QModelIndex &index) const override
    {
        CHECK_flags(index);
        if (!index.isValid())
            return {}; // do not allow dropping between items
        if (index.column() > 0)
            return Qt::ItemIsEnabled | Qt::ItemIsSelectable; // don't drop on other columns
        return Qt::ItemIsEnabled | Qt::ItemIsSelectable | Qt::ItemIsDropEnabled;
    }

    // the default is "copy only", change it
    Qt::DropActions supportedDropActions() const override { return Qt::MoveAction | Qt::CopyAction; }
  
    QStringList mimeTypes() const override { return {QString::fromLatin1(s_emailsMimeType)}; }
  
    bool dropMimeData(const QMimeData *mimeData, Qt::DropAction action, int row, int column, const QModelIndex &parent) override;
};

☑ Reimplement flags()
For a valid index (and only in that case), add Qt::ItemIsDropEnabled. As you can see, you can also restrict drops to column 0, which can be more sensible when using QTreeView (the user should drop onto the folder name, not onto the folder size).

☑ Reimplement supportedDropActions() to return Qt::MoveAction | Qt::CopyAction or whichever you want to support (the default is CopyAction only).

☑ Reimplement mimeTypes() - the list should include the MIME type used by the drag model.

☑ Reimplement dropMimeData()
to deserialize the data and handle the drop.
This could mean calling setData() to replace item contents, or anything else that should happen on a drop: in the email example, this is where we copy or move the email into the destination folder. Once you're done, return true, so that the drag side then deletes the dragged rows by calling removeRows() on its model.

bool FoldersModel::dropMimeData(const QMimeData *mimeData, Qt::DropAction action, int row, int column, const QModelIndex &parent)
{
    ~~~  // safety checks, see full example code

    EmailFolder *destFolder = folderForIndex(parent);

    const QByteArray encodedData = mimeData->data(s_emailsMimeType);
    QDataStream stream(encodedData);
    ~~~ // code to detect and reject dropping onto the folder currently holding those emails

    while (!stream.atEnd()) {
        QString email;
        stream >> email;
        destFolder->emails.append(email);
    }
    emit dataChanged(parent, parent); // update count

    return true; // let the view handle deletion on the source side by calling removeRows there
}

Using item widgets

Example code:

On the "drag" side

☑ Call widget->setDragDropMode(QAbstractItemView::DragOnly) or DragDrop if it should support both

☑ Call widget->setDefaultDropAction(Qt::MoveAction) so that the drag defaults to a move and not a copy, adjust as needed

☑ Reimplement Widget::mimeData() to serialize the complete data for the dragged items. If the views are always in the same process, you can get away with serializing only item pointers and application PID (to refuse dropping onto another process). In our email folders example we also serialize the pointer to the source folder (where the emails come from) so that we can detect dropping onto the same folder (which should do nothing).

To serialize pointers in QDataStream, cast them to quintptr, see the example code for details.

On the "drop" side

☑ Call widget->setDragDropMode(QAbstractItemView::DropOnly) or DragDrop if it should support both

☑ Call widget->setDragDropOverwriteMode(true) for a minor improvement: no forbidden cursor when moving the drag between folders. Instead Qt only computes drop positions which are onto items, as we want here.

☑ Reimplement Widget::mimeTypes() and return the same name as the one used on the drag side's mimeData

☑ Reimplement Widget::dropMimeData() (note that the signature is different between QListWidget, QTableWidget and QTreeWidget) This is where you deserialize the data and handle the drop. In the email example, this is where we copy or move the email into the destination folder.

Make sure to do all of the following:

  • any necessary behind the scenes work (in our case, moving the actual email)
  • updating the UI (creating or deleting items as needed)

This is a case where proper model/view separation is actually much simpler.

Improvements to Qt

While writing and testing these code examples, I improved the following things in Qt, in addition to those listed in the previous blog posts:

  • QTBUG-2553 QTreeView with setAutoExpandDelay() collapses items while dragging over it, fixed in Qt 6.8.1

Conclusion

I hope you enjoyed this blog post series and learned a few things.

The post Model/View Drag and Drop in Qt - Part 3 appeared first on KDAB.

Wednesday, 2 April 2025

This is for everyone upgrading to Plasma 6.3.4, which was released yesterday. I suspect that some of you will notice something slightly wrong with notifications; the top padding is off, causing text to look not vertically centered most of the time.

This is my fault. The recent bug-fixes I made to notification spacings and paddings were backported to Plasma 6.3.4, but ended up missing a part that positions the text labels nicely when there’s body text or an icon, and didn’t notice this until after 6.3.5 was released. The fix was just merged and backported for Plasma 6.3.5, so unless your distro backports the fix (I’ve already emailed the appropriate mailing list about this) you’ll have to live with slightly ugly label positioning until then. Sorry folks! My bad.

Once you have the fix — either because your distro backports it or because you’ve waited until Plasma 6.3.5 — notification text positioning should look better again:

Tuesday, 1 April 2025

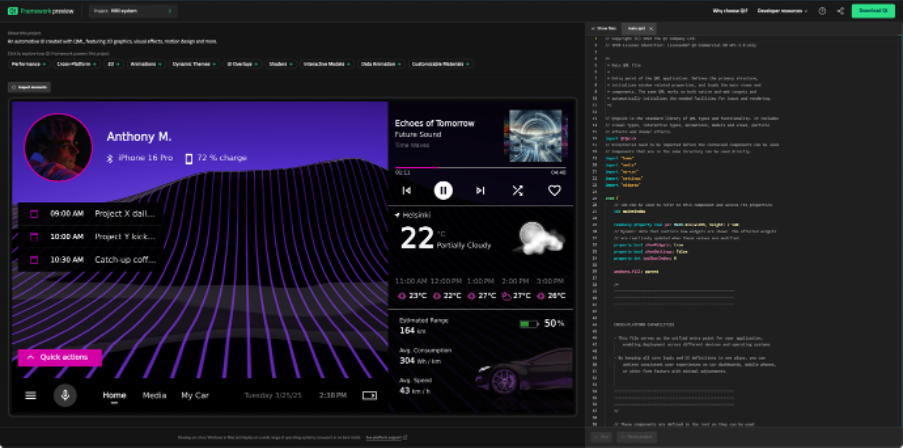
We have been busy working on a totally new way to explore the world of Qt, and it's available at try.qt.io! Try.qt.io is all about ease of use and taking the first Qt experience to a whole new level. You are able to play around with a fully functional, Qt application and simultaneously investigate how the application is made.


KStars v3.7.6 is released on 2025.04.01 for Windows, MacOS & Linux. It's a bi-monthly bug-fix release with a couple of exciting features.

Scheduler Plans Visualized


Hy Murveit added a graph to the Scheduler page that displays visually the scheduler's plans--the same plans described in the log at the bottom of that page, and partially described in the scheduler's table. You can see altitude graphs for all the scheduler jobs, which are highlighted in green when that job is planned to be active. The next two nights of the plan can be accessed using buttons to the right (and left) of the graph. The graph can be enlarged or hidden by sliding the "splitter" handle above it up or down.


PHD2 & Internal Guider RMS


Many users reported differences between the RMS value reported by Ekos internal guider vs PHD2. This is not a new issue as there was a difference in RMS calculations ever since Ekos Guider module was developed over a decade ago. In this release, we updated the internal Guider RMS calculations to use the same algorithm used by PHD2. This way, there is now a more consistent metric to judge the performance of the two guider systems.

Weather Scheduler Integration


Weather station integration with the scheduler was improved. The weather enforcement is now global and not per job. If weather enforcement is enabled, you can adjust the Grace Period (default 10 minutes) in cases where the scheduler cannot be started due to a weather Alert or Warning. 


When a weather warning is received, existing jobs can continue to execute but new jobs will not be executed until the weather situation improves. Upon detecting a weather hazard, the scheduler execute a Soft shutdown mode where it can park the mount and dome, but still retains connection with INDI drivers to continue monitoring the weather situation. If the weather does not improve by the Grace Period, it then commences a full shutdown of the observatory. Otherwise, it should resume the job from where it was left.

Contrast Based Focusing


John Evans added an option to allow focusing on non-star fields by using various contrast based algorithms. This is suitable for Lunar, Solar and planetary imaging.


Autofocus Optimization


John Evans added an option has been added to Focus that allows an Autofocus run to re-use a previous successful Autofocus result if the previous AF run occurred within a user-defined time period, say <10mins ago. This can speed up certain situations when using the Scheduler where multiple Autofocus requests can happen within a short period of time.


Imaging Planner Improvements


Hy Murveit pushed a new Imaging Planner catalog release along with improvements to the KStars Imaging Planner.
  • It should now start up much more quickly on first use, or first use after a catalog upgrade.
  • There were stability improvements.
  • The catalog was extended to include 770 objects.
Upgrade to KStars 3.7.6, use Data -> Download New Data to get the latest Imaging Planner catalog, and run Load Catalog in the Imaging Planner tool to take advantage of all these improvements.

Quick Go & Rotate


Added support to Go and Rotate in Framing Assistant. This would command fast go to target and then followed by rotation to match position angle indicated. Simply adjust the Position Angle to your desired angle then command Ekos to solve and rotate in one go.

Scheduler Coordinates Flexibility


Wolfgang Reissenberger introduced enhancements for handling target coordinates in the scheduler module:

  • Add an option to switch the target coordinates between J2000 and JNow. This is interesting for those cases where the user wants to enter the coordinates manually, but has the coordinates only in JNow - for example when taking them over from the align module.
  • Add a "use the current target" button. Currently, there is only an option to take over the current skymap center.
Furthermore, during the time where the moon is visible, it should be possible to schedule only those jobs that are not disturbed by moonlight (e.g. H-alpha captures). To enable this, a new optional constraint is introduced where the maximal moon altitude could be set.

Use PHD2-scheme graph


Toni Schriber modified the internal guider chart to use PHD2-scheme (RA/DEC) for graph of guide mount drift. This should help comparisons between PHD2 and internal guider more consistent.

Tuesday, 1 April 2025. Today KDE releases a bugfix update to KDE Plasma 6, versioned 6.3.4.

Plasma 6.3 was released in February 2025 with many feature refinements and new modules to complete the desktop experience.

This release adds three weeks’ worth of new translations and fixes from KDE’s contributors. The bugfixes are typically small but important and include:

  • Fix glitch while scrolling with touch. Commit.
  • ToolsAreaManager: Store windows as a vector. Commit. Fixes bug #501688
  • Kstyle: Don't replay scrollbar mouse event to same position. Commit.
View full changelog

Hey everyone!!

Welcome to my blog post. I am Roopa Dharshini, a mentee in Season of KDE 2025 for the KEcoLab project. In this blog, I will explain my work in the SoK mentorship program.

Getting Started With SoK

For my proposal I crafted a detailed timeline for each week. With this detailed plan and with the help of my wonderful fellow contributors and mentors, I was able to complete all the work before the end of the mentorship program.

Various technical documentation tools under consideration (screenshot from Roopa Dharshini published under a <a href=\CC-BY-SA-4.0 license.)" src="https://eco.kde.org/blog/images/2025-03-31-roopa-sok25-proposal.png" style="max-width: 100%; height: auto" />

I started by first week working to understanding the project's codebase, studying KECoLab's handbook and existing documentation, setting up a GitLab wiki in the forked repository, and discussing the GitLab wiki's Merge Request (MR) feature. I explored and discussed various technical documentation tools with the mentors. Initially, we had planned to continue with GitLab, but later due to the flexibility of KDE's community wiki, we proceeded with that as our preferred documentation tool.

Usage scenario script documentaion (screenshot from Roopa Dharshini published under a <a href=\CC-BY-SA-4.0 license.)" src="https://eco.kde.org/blog/images/2025-03-31-roopa-sok25-usage-scenario.png" style="max-width: 100%; height: auto" />

I got to work creating an outline for the entire technical documentation. Usage scenarios scripts are essential for executing the automation pipeline in KEcolab. So, my fellow mentees and I started our documentation process with usage scenario scripting: we drafted a short page describing it's importance, provided some scripts, and detailed their structure. This documentation is structured in a way that even non-technical contributors are able to follow the guidelines and create their own scripts.

CI/CD Pipeline documentation (screenshot from Roopa Dharshini published under a <a href=\CC-BY-SA-4.0 license.)" src="https://eco.kde.org/blog/images/2025-03-31-roopa-sok25-ci-cd.png" style="max-width: 100%; height: auto" />

After this, I wrote various texts for the technical documentation (CI/CD pipeline, Home Page) of the KEcoLab project. There was a change in the audience for our documentation: initially we focused on the users of KEcoLab, but later we decided to write documentation for both the people who wish to contribute and provide new changes to KEcoLab as well as those who use KEcoLab for their software measurements. This change had us writing in-depth technical documentation for developers who wish to change the code for better efficiency. The CI/CD pipeline is essential for the energy measurement automation in KEcoLab. Writing detailed CI/CD pipeline documentation that explains its use, structure, and job execution was challenging, yet rewarding.

  1. User Guide documentation for KEcoLab Users
  2. Usage Scenario Script documentation
  3. Accessing result documentation for users
  4. CI/CD pipeline documentation for contributors
  5. Contribution guidelines

How did I apply to Season of KDE?

Accepted Proposal (screenshot from Roopa Dharshini published under a <a href=\CC-BY-SA-4.0 license.)" src="https://eco.kde.org/blog/images/2025-03-24-roopa-sok25-proposal.png" style="max-width: 100%; height: auto" />

Season of KDE is a mentorship program that happens every year between January and March. It is a three-month mentorship where mentees will be guided through a project they propose. You start by writing a proposal and timeline to work on from the projects listed on the KDE Ideas page. You tag the mentors in the issue, and they will review your proposal and check whether you are suitable or not. You can checkout my proposal for the KEcoLab project. After review, mentors will hopefully mark your proposal as accepted. And that’s how I got into it!

Challenges I faced

Applying to SoK was not easy for me. I ran into my first challenge when I tried to create a new KDE Invent account. I thought there were some technical issues with the website, so I tried every day to create an account (you are limited to one account creation chance per 24-hour period). After a long wait, I reached out to SoK admin Johnny for help, and he assisted me in creating an account. I was really scared to submit my proposal because there was only one week before the submission deadline, but I trusted my skills and submitted it. So, keep in mind that “it is never too late to apply."

The second challenge was team collaboration. Similar to me, there were 2 other contributors selected for this project. I was brand new to KDE. At first it was hard to communicate with my other contributors, but later on we started to work really well together. Those are the main challenges I faced during my contributions to SoK. Challenges are never an end point; they are a stepping stone to move further.

Thank You Note!

Challenges make the journey worthwhile. Without any challenges, I wouldn’t have known the perks of contributing to KDE in SoK. I take a moment here to thank my wonderful mentors Kieryn, Aakarsh, Karanjot, and Joseph for guiding me throughout this journey. Also, I want to thank my fellow contributors to the project Shubhanshu and Utkarsh for collaborating with me to achieve what we proposed successfully. Finally, I am thankful to the KDE e.V. and the KDE community for supporting us new contributors to the amazing KDE project.

KEcoLab is hosted on Invent. Are you interested in contributing? You can join the Matrix channels Measurement Lab Development and KDE Eco and introduce yourself.

Thank you!

Hi everyone! I’m excited to share my experience so far as a mentee in the Season of KDE program. For those unfamiliar, Season of KDE is an amazing initiative by the KDE community that allows students and newcomers like me to contribute to open-source projects under the guidance of experienced mentors. This year, I’m working on the KDE Eco project, specifically creating comprehensive documentation—both written and video—for the KDE Eco Remote Eco Lab. This blog post is a chance for me to reflect on what I’ve accomplished, the challenges I’ve encountered, and my plans moving forward.

What is the KEcoLab?

The KDE Eco Remote Eco Lab is a project within the KDE Eco initiative, which is part of the KDE community's efforts to promote sustainability through energy-efficient Free Software. Specifically, the Remote Eco Lab provides a way for developers to measure the energy consumption of their software remotely, using a specialized lab located in Berlin. This lab was established with support from KDAB. My role is to develop clear and accessible documentation to help users understand how to set up, use, and benefit from this tool. This includes written guides and video tutorials. I’m thrilled to be working on the video part of the project!

What I’ve Done So Far

Since starting the program, I’ve been diving into the project and making steady progress. Here’s a rundown of what I’ve accomplished so far.

First, there was research and familiarization. I began by exploring the Remote Eco Lab—reading any existing materials, studying its features, and understanding its purpose. I also had productive discussions with my mentor to align on goals and expectations.

Second, work on written documentation. In the KDE Eco Remote Eco Lab project, we’re working as a tight-knit team, with tasks divided among us to cover all bases. My main focus is on creating video documentation, but I also get to collaborate with my teammates who are tackling the written documentation. I often sit down with them to brainstorm, which has been a fantastic way to contribute beyond my primary role. It’s exciting to see how our efforts—video and written—come together to make the project more accessible to users.

Finally, video documentation prep. For the video documentation, I’ve been working on a script to guide users through the Remote Eco Lab’s features. It’s currently being refined with feedback from my mentors, who are helping me make it sharper and more user-friendly.

I initially created a simple script to guide myself while making the video. As I progressed, I developed it into a much more detailed version to give others a clear understanding of the video’s structure and flow. The mentors appreciated the detailed script and gave me their approval, as it provided them with a clear idea of how the video would take shape. You can refer to that detailed script here.

To finalize how we’re going to present the concept of reiterating until an energy drop is visible in our software, I’ve created a small proof-of-concept video. This video effectively demonstrates how, after reviewing your software reports, you can make the needed tweaks and then re-check the results using KEcoLab to decrease energy consumption and contribute to sustainability.

Video: Proof of concept for the KEcoLab video documentation. (Video from Utkarsh Umre published under a CC-BY-SA-4.0 license.)

While that’s in progress, I’ve been digging deeper into the Remote Eco Lab itself—especially the energy consumption reports it generates, which are key for developers aiming to optimize their software. At the same time, I’m learning Kdenlive, an KDE's video editing tool, to bring the script to life. It’s been a fun challenge to master, and I’m excited to create tutorials that will help users get the most out of KEcoLab.

These steps have helped me build a solid foundation for the documentation, and I’m proud of the progress I’ve made!

Challenges I’ve Faced

Of course, the journey hasn’t been without its hurdles. Here are a couple of challenges I’ve encountered:

My work on the KDE Eco Remote Eco Lab hasn’t been without hiccups. Initially, I struggled to understand the final energy consumption reports—the data felt overwhelming and confusing. With help from my mentors and some extra digging, I’ve started to get it, which is key for my video tutorials. Another challenge was setting up OBS Studio for recording—it kept crashing on my system. After some trial and error, including updating my drivers, I got it running smoothly. Beyond these, things have gone pretty well, and I’m learning a ton!

While these challenges slowed me down at times, they’ve also been valuable learning opportunities. I’m growing more confident with each step!

Outlook for the Future

I’m honestly so excited to keep going with the KDE Eco Remote Eco Lab project. My big focus right now is the video documentation—I’ve been messing around with my script, getting some awesome feedback from my mentors, and I’m almost ready to hit record. I’m hoping to have a handful of tutorials done by the time Season of KDE wraps up. I’ll be using OBS Studio to capture everything and Kdenlive to edit it into something that’s easy to follow and actually looks good. My teammates are busy crushing it on the written guides, and I can’t wait to see how it all comes together. Oh, and guess what? I just found out my talk got picked for the KDE India Conference 2025, happening April 4-6 in Gandhinagar! I’ll be sharing my KDE Eco adventure and what I’ve been up to as a Season of KDE mentee. It’s a little nerve-wracking but mostly thrilling, and I’m pumped to prep for it while juggling my video stuff!

Final Thoughts

Participating in Season of KDE has been an incredible experience so far. I’m not only sharpening my technical and creative skills but also getting a front-row seat to the collaborative spirit of the KDE community. I’m grateful to my mentors Aakarsh, Kieryn, Karanjot, and Joseph for their guidance and to the community for this opportunity. I can’t wait to see how the project evolves and to share my final update in the next blog post!

Interested In Contributing?

KEcoLab is hosted here. If you are interested in contributing, you can join the Matrix channels Measurement Lab Development and KDE Eco and introduce yourself. Thank you to the Season of KDE 2025 admin and mentorship team, the KDE e.V., and the incredible KDE community for supporting this project.

Please feel free to contact me here:

Monday, 31 March 2025

KDE Dragon

Introduction -

Over the last 10 weeks, I had the opportunity to contribute to MankalaEngine by exploring and integrating new algorithms for gameplay, as well as working on adding the Pallanguli variant to the engine. My journey involved researching about various algorithms like Monte Carlo Tree Search (MCTS), implementing Q-learning, an ML-based approach, and evaluating their performance against the existing algorithms of MankalaEngine. Also assisted in reviewing the implementation of the Pallanguli variant.

Implementing and Testing MCTS

I first explored Monte Carlo Tree Search (MCTS) and implemented it in MankalaEngine. To assess its effectiveness, I tested it against the existing algorithms, such as Minimax and MTDF, which operate at depth 7 before each move.

MCTS Performance Results -

Player 1Player 2MCTS Win Rate
RandomMCTS80%
MCTSRandom60%
MinimaxMCTS0%
MCTSMinimax0%
MTDFMCTS0%
MCTSMTDF0%

The results was not good enough. This was expected because existing Minimax and MTDF algorithms are strong and operate at depth 7 before each move.

Moving to Machine Learning: Implementing Q-Learning.

Given MCTS's poor performance against strong agents, I explored Machine Learning (ML) techniques, specifically Q-Learning, a reinforcement learning algorithm. After learning its mechanics, I implemented and trained a Q-learning agent in MankalaEngine, testing it against existing algorithms.

Q-Learning Performance Results -

Player 1Player 2Q-Learning Win Rate
RandomQ-Learning100%
Q-LearningRandom98%
MinimaxQ-Learning100%
Q-LearningMinimax0%
MTDFQ-Learning100%
Q-LearningMTDF10%

Q-learning showed significant improvement, defeating existing algorithms in most cases. However, it still had weaknesses.

Techniques Explored to Improve Q-Learning Results:

To improve performance, I experimented with the following techniques:

  • Using Epsilon decay to balance exploration (random moves) and exploitation (using learned strategies).

  • Increased rewards for wins to reinforce successful strategies.

  • Training Q-learning against Minimax and MTDF rather than only against itself.

Despite these improvements, Q-learning still could not consistently outperform all existing algorithms.

After these experiments and research, I believe more advanced algorithms like DQN or Double DQN are needed to outperform all existing algorithms. This would also an exciting project for this summer.

Apart from exploring ML algorithms, I also worked on integrating the Pallanguli variant of the Mancala game into MankalaEngine. My contributions included:

  • Reviewing Srisharan’s code, suggesting fixes and discussions.

  • Creating Merge Request (MR) that allows users to input custom initial counters for Pallanguli.

Conclusion -

This journey has been an incredible learning experience, and I am grateful for the guidance of my mentors, Benson Muite and João Gouveia, who were always there to help.

I look forward to continuing my contributions to the KDE Community, as I truly love the work being done here.

Thank you to the KDE Community for this amazing opportunity!

Many people are, understandably, confused about brightness levels in content creation and consumption - both for SDR and for HDR content. Even people that do content creation as their job sometimes get it really wrong.

Why is there so much bad information about it out there?

Before jumping into the actual topic, I want to emphasize that most people that have gaps in their knowledge about HDR and SDR are not to blame for it. The standards that define colorspaces are usually confusingly written, many don’t paint the full picture, finding the one you actually need can be difficult, some you need to pay for to even read, and generally there is not a lot of well organized and free information about this out there.

When you have basically no information, you just go with what you do know - you see how Microsoft Windows does HDR for example, maybe you take a look at a draft for the sRGB specification or simply the Wikipedia pages, and do the best with what you have. The result is often less than ideal.

Having worked on this stuff for a while now, and having read lots about it from people that actually know what they’re doing, I think I know the topic well enough to clear up some misconceptions, but do keep in mind that my knowledge is limited too, and I may still make mistakes. If you’re sure I got anything wrong, tell me about it!

If you want an entry point for way more information than this blog post provides, check out color-and-hdr.

How brightness works with sRGB

sRGB is the colorspace most content uses today. Despite that, very annoyingly, its specification is not openly available… but there’s a draft version that you can download freely here, which is good enough for this topic.

The (draft) specification defines two things that are important when it comes to brightness:

  • a set of reference display conditions
  • a set of reference viewing conditions (I’ll call that “viewing environment” from here on)

The reference display conditions are seemingly quite straight forward. The display luminance is 80cd/m², we have a whitepoint of D65, and a transfer function. Transfer functions describe how to calculate the output luminance from the encoded values of an image, and with sRGB that’s

Y = X ^ 2.2

where Y is the relative luminance on the display, and X is the relative luminance on the input.

The viewing environment has a few more parameters, but it’s conceptually not difficult to understand: It describes how bright your environment is, what color temperature the lights in your room have, and how much your display reflects the environment at you.

sRGB viewing environment

How to create sRGB content “correctly”?

The assumption that many people take from the specification is that you should calibrate your display to 80cd/m². On its own, that information is completely wrong!

It’s obvious when you think about how end users actually view content: They set the brightness level of the display to what they’re comfortable with in the current environment. You make the display really bright when you’re outside, less bright when in a normally lit room, and even darker than that when the lights are off.

The part that’s missing with just calibrating the display to some luminance level is that you must take the viewing environment into account. Either you set up the sRGB reference viewing environment (with measurements!)… or you just don’t. When you create content, in most cases you should do exactly the same thing as the person that will consume the content does: Just set the brightness to what’s comfortable in the environment you’re in. It still helps to keep your viewing environment mostly fixed of course, lots of brightness changes mean you’re constantly readjusting and that’s not good.

There’s another big thing to take into account for sRGB, which is its confusing transfer function.

The sRGB transfer function

The sRGB specification doesn’t just define a transfer function for the display, but it also defines a second transfer function. This sRGB piece-wise transfer function is

if X < 0.04045: Y = X / 12.92
else: Y = ((X + 0.055) / 1.055)^2.4

and it’s slightly different from gamma 2.2 in that it has that linear bit for the very dark area.

The purpose of this transfer function is to optimize encoding of dark parts of the image - with 8 bits per color, gamma 2.2 becomes really small in the lowest few values. 1/255 for example results in roughly 0.0000051 with gamma 2.2, and 0.0003035 with the sRGB piece-wise transfer function.

This difference might sound insignificant, but it is noticeable. The most well known place of where the wrong transfer function is used is Microsoft Windows: When you enable HDR in Windows, it uses the piece-wise transfer function for sRGB content, instead of the gamma 2.2 transfer function that which your display uses in SDR mode. The result is that dark areas of SDR games and videos are brighter than they should be, and look “washed out”.

So when should you use the sRGB piece-wise transfer function? So far, I don’t know of any case where you should, outside of working around that Windows problem in your application… I’m also only concerned with displaying images though, and not editing or creating them, so take that with a grain of salt.

How brightness works with HDR

Most HDR content uses the SMPTE ST 2084 transfer function. The specification for this is freely available here.

SMPTE ST 2084 is a bit different from the sRGB spec, in that it only defines a transfer function but no complete colorspace or viewing environment. That transfer function is the Perceptual Quantizer (PQ): It tries to compress luminance levels in a way that matches how sensitive human eyes are in specific luminance ranges, and it’s defined in absolute luminance - a PQ value of 0.0 means <= 0.005cd/m², and 1.0 maps to 10000 cd/m².

The missing parts are defined by different specifications, rec.2100 and BT.2408. More specifically, rec.2100 uses the BT.2020 primaries with the PQ transfer function (or the HLG transfer function, but we’ll ignore that here) and a recommended viewing environment for such HDR content:

rec.2100 viewing environment

BT.2408 expands on that with an HDR reference white and graphics white, at 203cd/m². This is mostly meant for the context of broadcasts, referring with “graphics” to logos or subtitles in the video stream.

Despite the transfer function being “absolute”, just like with sRGB, the luminance numbers don’t mean anything in isolation. When displaying HDR content, just like with SDR, we need to take the viewing environment into account, and adjust luminance levels accordingly.

How is this handled in Wayland?

Every transfer function in the color management protocol has reference display conditions and a viewing environment attached to it, defined by a few parameters. Most relevant for this topic are

  • a reference luminance, also known as HDR reference white, graphics white or SDR white
  • minimum and maximum mastering luminances, basically how dark and bright the display the content was made for can go

When content is displayed on the screen, the compositor translates between the viewing environment of the content, and the viewing environment of the user. While we don’t usually have full knowledge of what exactly that viewing environment is like, the brightness slider in KDE Plasma provides a very good approximation by configuring the reference luminance to be used for content on the display. The calculation for this brightness adjustment is rather simple, in linear space you just do

output = input * output_reference / input_reference

You can configure the maximum reference luminance (brightness slider at 100%) with the “Maximum SDR Brightness” in the display settings of Plasma 6.3. The minimum and maximum luminance your display can achieve can only be configured with the kscreen-doctor command line tool right now, but an easy to use calibration utility for this is nearly finished (and the default values are usually fine too).

In general, this system is working really well… with one rather big exception.

HDR in Windows games

As mentioned before, Windows in HDR mode does sRGB wrong, but the story with HDR content is kind of worse.

When you use Windows 11 on a desktop monitor and enable HDR, you get an “SDR content brightness” slider in the settings - treating HDR content as something completely separate that’s somehow independent of the viewing environment, and that you cannot adjust the brightness of. With laptop displays however, you get a normal brightness slider, which applies to both SDR and HDR content.

The vast majority of Windows games expect the desktop monitor case: Static, never changing luminance levels, which are displayed on the screen without any adjustments whatsoever. Windows also didn’t have a built-in HDR calibration tool until Windows 11, so nearly every Windows game ships with its own HDR calibration settings and completely ignores system settings. This doesn’t just cause issues for Windows 11 laptops of course, but also for playing these same games with HDR on Linux.

Until Plasma 6.2, we worked around that, also mostly not doing brightness adjustments, and the result was that those HDR calibration settings in games worked basically like on Windows. However, these workarounds broke Linux native applications that want to mix HDR and SDR in their own windows, made tone mapping worse, and blocked features like HDR on “SDR” laptop displays, so in Plasma 6.3 we had to drop them.

This doesn’t mean you can’t play Windows games with HDR in 6.3 anymore, you just have to adjust their configuration to match the changed brightness levels. In most cases, this means you set the HDR paper white in games to 203cd/m², and then set the maximum luminance with the game’s configuration screen, like this one from Baldur’s Gate 3:

Baldur's Gate 3 HDR calibration

How to implement good HDR

After ranting about how Windows games do it wrong, I should end this blog post by also explaining how to do it right. I will skip most of the implementation details, but on a high level if you’re implementing HDR in a Wayland native application or toolkit, you should

  • use the Wayland color management protocol
  • get the capabilities of the compositor and/or graphics driver, specifically the transfer functions they support
  • get the preferred image description from the compositor, and the luminances you’re supposed to target from that. When using these luminance values, keep in mind that reference luminance adjustment the compositor will do!
  • every time the preferred image description changes, get the new one and adjust your application to it
  • now render for these parameters, and set the image description you actually ended up targeting on the surface, either through Vulkan or with the Wayland protocol (not both at the same time!)
  • SDR things, like user interfaces in games, should use the reference luminance too
  • if your application has some need to differentiate between “SDR” and “HDR” displays (to change the buffer format for example), you can do so by checking if the maximum mastering luminance is greater than the reference luminance
  • now you can, and really should drop all HDR settings from your application. If HDR has a performance penalty in your application, a toggle to limit the app to SDR could still be useful, but everything else should be completely automatic and the user should not be bothered with calibration screens or similar annoyances

Qt Group is pleased to announce Qt for MCUs 2.10, a release packed with exciting new features designed to broaden GUI capabilities across IoT, consumer, and automotive segments. This update is filled with enhancements that will empower developers to create even more dynamic and efficient applications.

This blog lists some of the standout highlights from the 2.10 release.